Your Complete Guide to Watchlists
Alright.. welcome to article number four in the Getting Started series. If you've been following along, you already know your way around the Research Terminal and the Portfolio Tracker. Now we're diving into one of the features I'm personally most excited about: Watchlists.
Whether you're tracking a handful of stocks you're eyeing for a buy, building a focused dividend list, or sharing your best ideas with the community.. watchlists are how you organize your research and keep everything in one place. And honestly, once you start using them, you'll wonder how you ever managed without them.
This guide covers everything. Creating watchlists, adding tickers, customizing your view, sharing with the community, and all the little details in between. Let's get into it.
What Are Watchlists?
Think of watchlists as your personal stock tracking boards. You create a watchlist, throw in the tickers you care about, and boom.. you've got a custom view of just those companies with all the same data columns from the Research Terminal. Same columns, same filters, same sorting, same everything. It's the Research Terminal, but focused only on the stocks you picked.
There are actually two sides to the watchlist system:
My Watchlists - These are your personal, private watchlists. Only you can see them (unless you choose to make one public). Create as many as your tier allows, add tickers, take notes, customize columns, and export data.
Community Watchlists - This is where things get social. When someone makes their watchlist public, it shows up on the Community Watchlists page where anyone can browse it, like it, and even copy tickers from it into their own watchlists.
I built this system because I wanted a way to not just track my own ideas, but also see what other people on the platform are watching. It makes the whole research process more collaborative and honestly more fun.
How to Get There
Getting to your watchlists is easy. There are two entry points in the navigation bar:
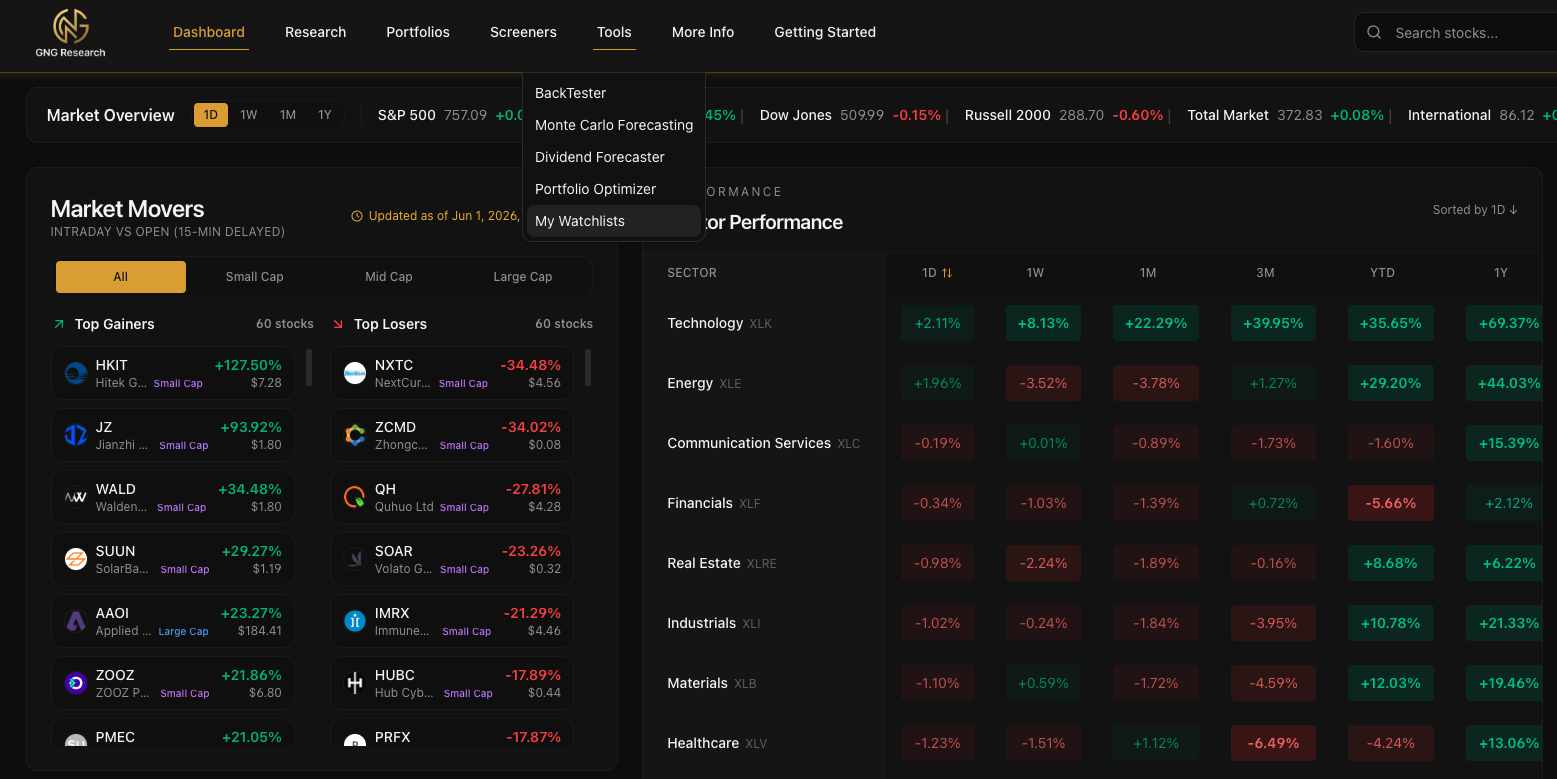
My Watchlists: Go to Tools in the top navigation bar. You'll see "My Watchlists" right there in the dropdown. Click it and you're in.
Community Watchlists: Go to Research in the top navigation bar. You'll see "Community Watchlists" in the dropdown. That takes you to the public browsing page.
That's it.. two clicks and you're where you need to be.

Creating Your First Watchlist
When you land on the My Watchlists page for the first time, you'll see a clean empty state with a big "Create Your First Watchlist" button. If you already have watchlists, you'll see a "+ New" button in the tab bar at the top. Either way, clicking it opens up the creation dialog.
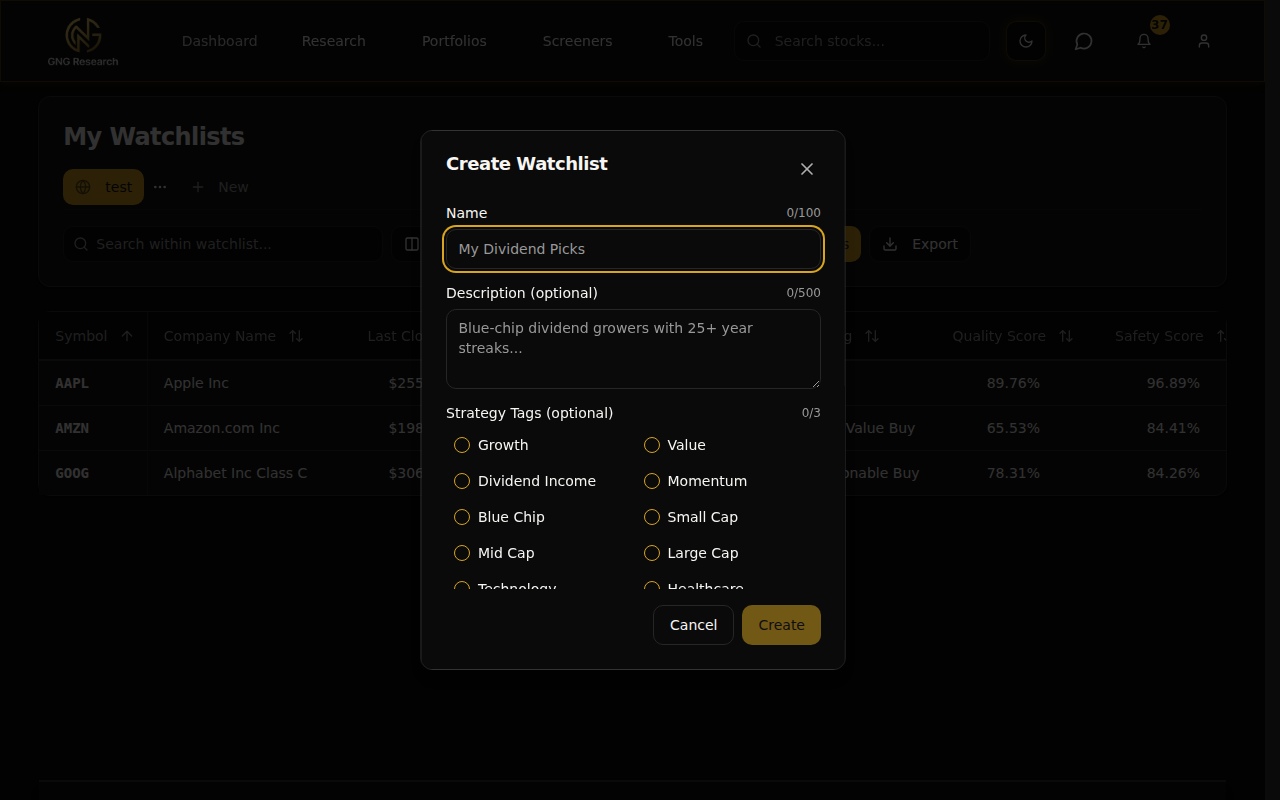
Here's what you fill out:
Name (required) - Give your watchlist a name. Something like "Dividend Kings", "Tech Growth Picks", "Q1 Buys", whatever makes sense to you. Max 100 characters, and you'll see a live character counter so you know how much room you have.
Description (optional) - A short description of what this watchlist is about. Up to 500 characters. This is especially useful if you plan to make the watchlist public later, because other people will see this on the Community page.
Strategy Tags (optional) - You can tag your watchlist with up to 3 strategy labels like "Dividend Income", "Growth", "Value", "Blue Chip", etc. These tags help people find your watchlist when browsing the community. There are 20 predefined tags to choose from.
Click "Create" and your watchlist is live. You'll be taken straight to it, ready to start adding tickers.
Adding Tickers
Once your watchlist is created, you need to fill it up. Click the "Add Tickers" button in the toolbar and a modal pops up with two ways to add stocks:
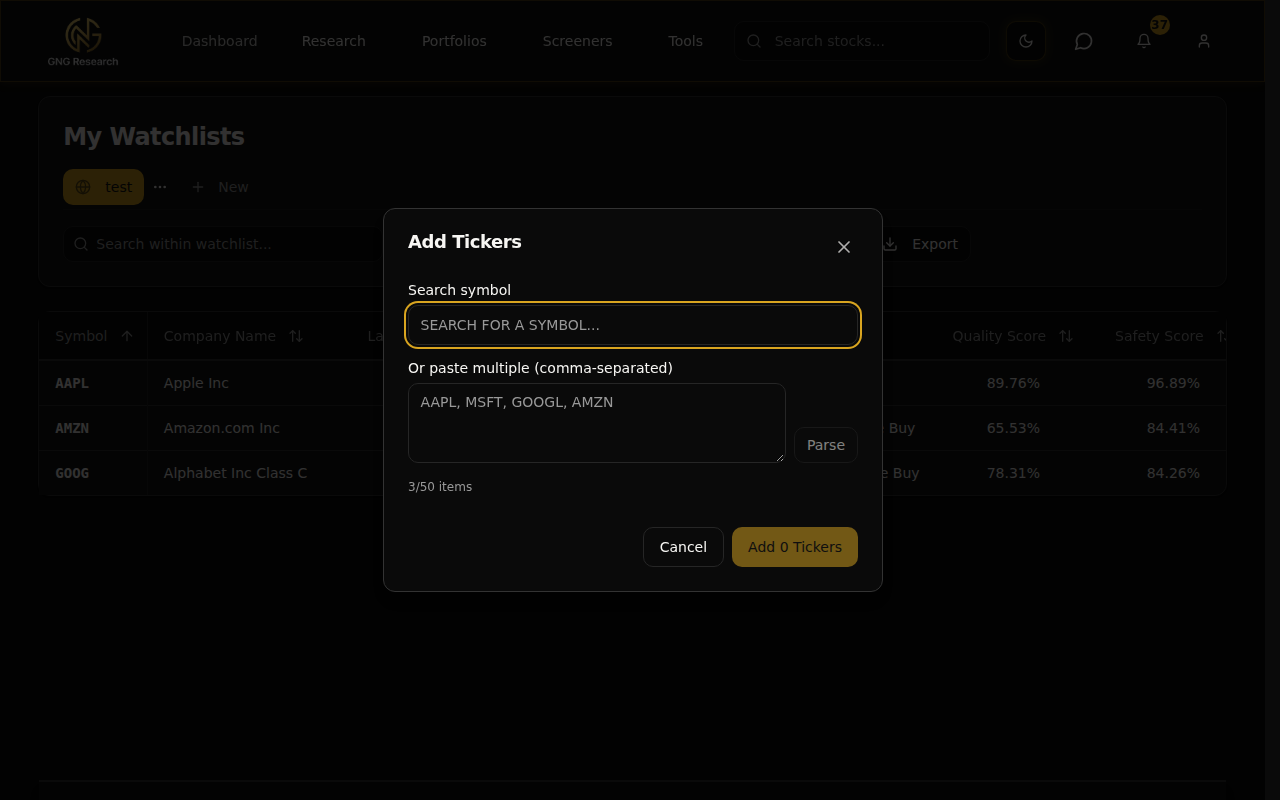
Method 1: Search
Start typing a ticker symbol or company name into the search field. An autocomplete dropdown will show matching results. Click on a result and it gets added as a pending badge. You can search and add multiple tickers one at a time.
Method 2: Bulk Paste
Got a list of tickers from somewhere else? Paste them all at once. The system accepts comma-separated, space-separated, or one-per-line formats. Hit "Parse" and they all show up as pending badges. This is the fastest way to build a watchlist if you already have your symbols ready.
Once you've got your pending badges showing, click "Add X Tickers" to confirm. The system automatically prevents duplicates. If a ticker is already in your watchlist, it won't add it again. And you'll see a live count of how many items you have versus your tier limit, so you always know where you stand.
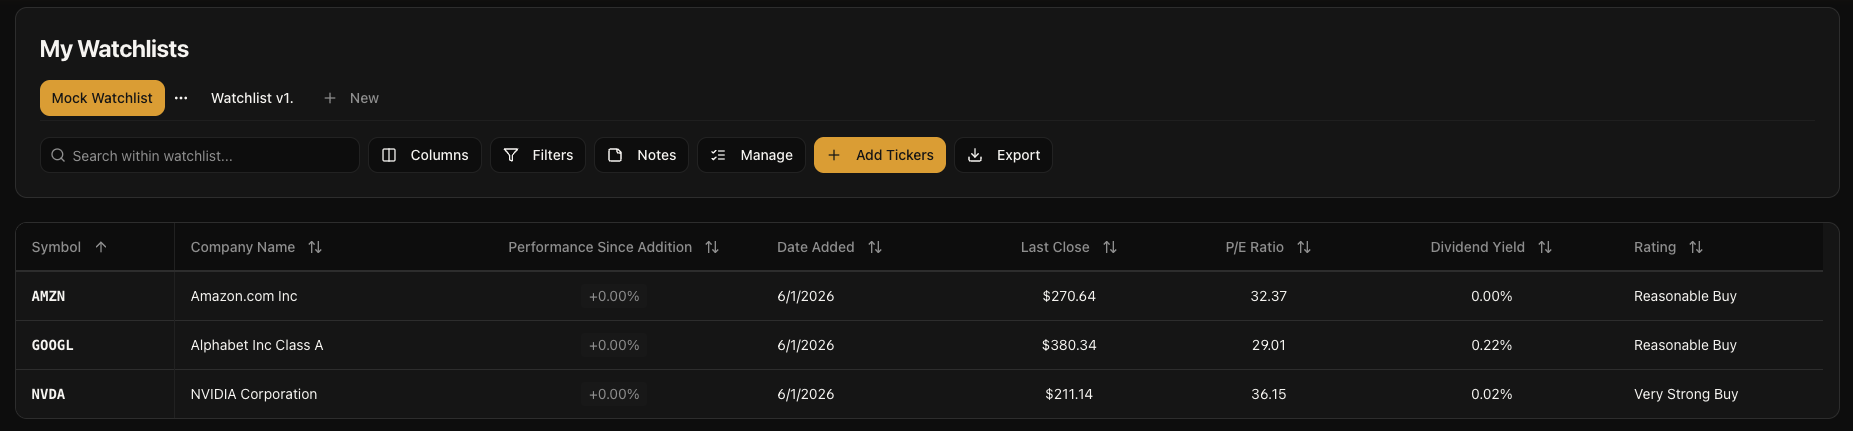
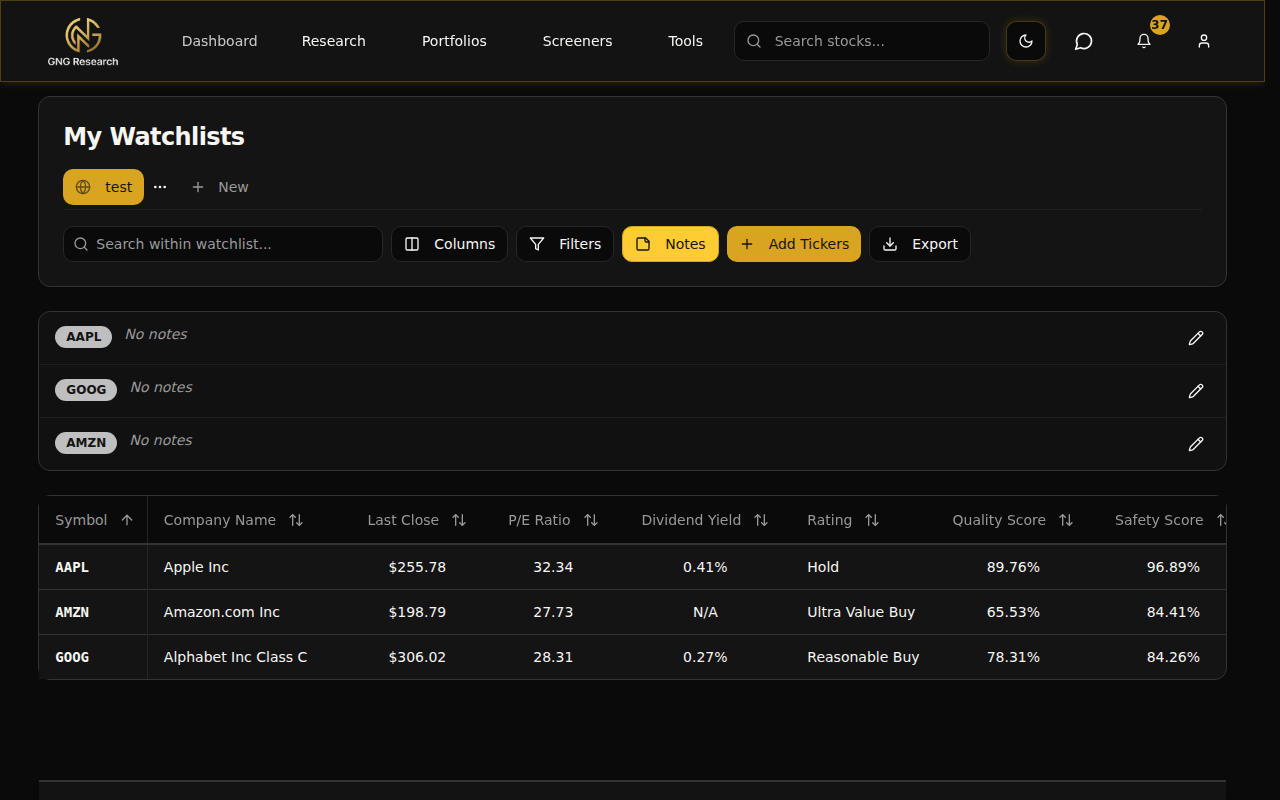
Your Watchlist Dashboard
Once you've got at least one watchlist with some tickers, here's what your dashboard looks like.
The Tab Bar
At the top, you'll see a horizontal tab bar with all your watchlists. Click any tab to switch between them. The active tab is highlighted so you always know which one you're looking at. If a watchlist is public, you'll see a small globe icon on its tab.
On the far right of the tab bar, there's the "+ New" button to create additional watchlists.
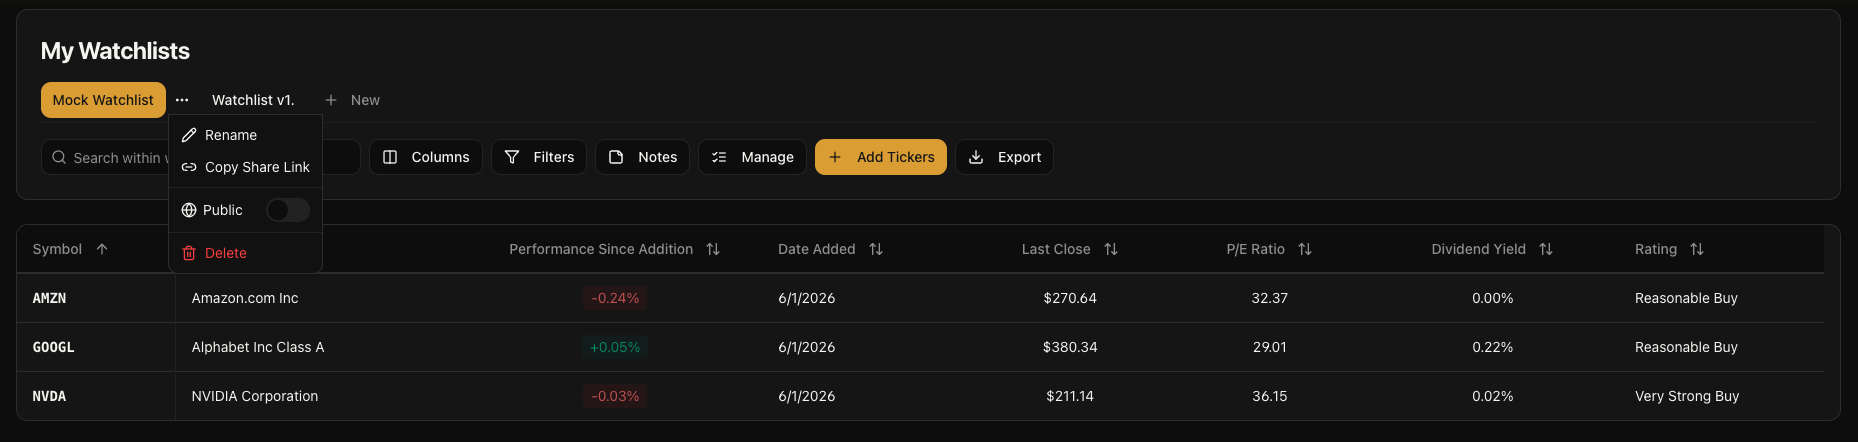
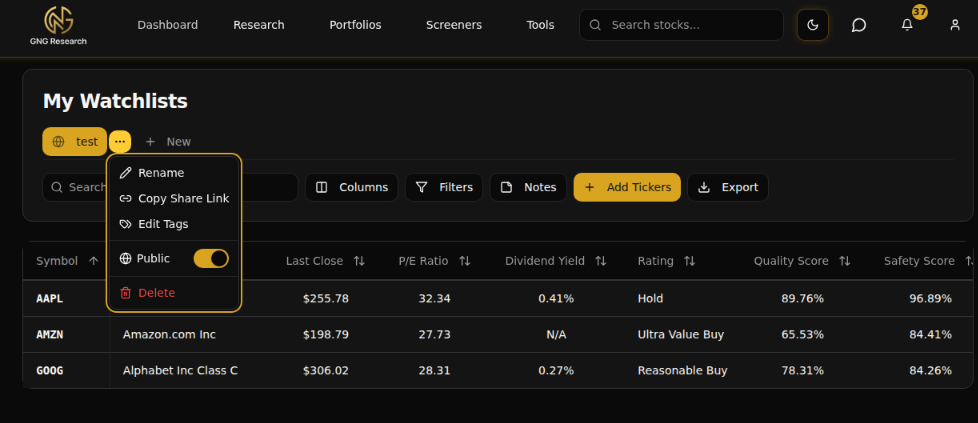
The Three-Dot Menu
Click the three-dot icon on the active tab and you get a dropdown with all your management options:
Rename - Change the watchlist name (max 100 characters)
Copy Share Link - Copies the direct URL to your clipboard (only available if the watchlist is public)
Edit Tags - Change the strategy tags on a public watchlist
Public/Private Toggle - Flip the switch to make your watchlist visible on the Community page (Pro tier and above)
Delete - Permanently remove the watchlist and all its items (with a confirmation dialog so you don't accidentally nuke anything)
The Toolbar
Alright, this is where the real power is. The toolbar sits right above your data table and gives you access to everything you need to customize your view.
Search
The search input on the left lets you quickly filter your watchlist by ticker symbol or company name. Start typing and the table updates in real time. Delete the text to see everything again.
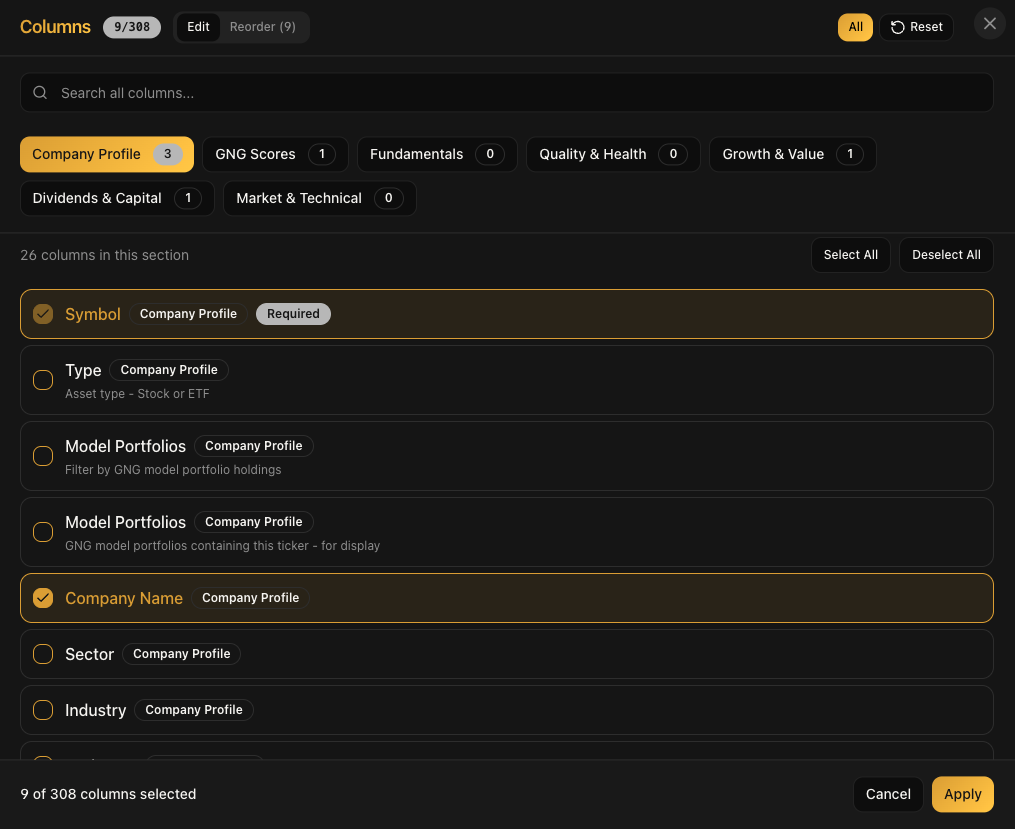
Columns
Click "Columns" and you'll get the same column selector from the Research Terminal. All 298 columns are available, organized into the same six super categories: GNG Scores, Fundamentals, Quality & Health, Growth & Value, Dividends & Capital, and Market & Technical. Search for any column by name, check the box to add it, uncheck to remove it. Your column setup is saved automatically per watchlist, so each watchlist can have its own custom view.
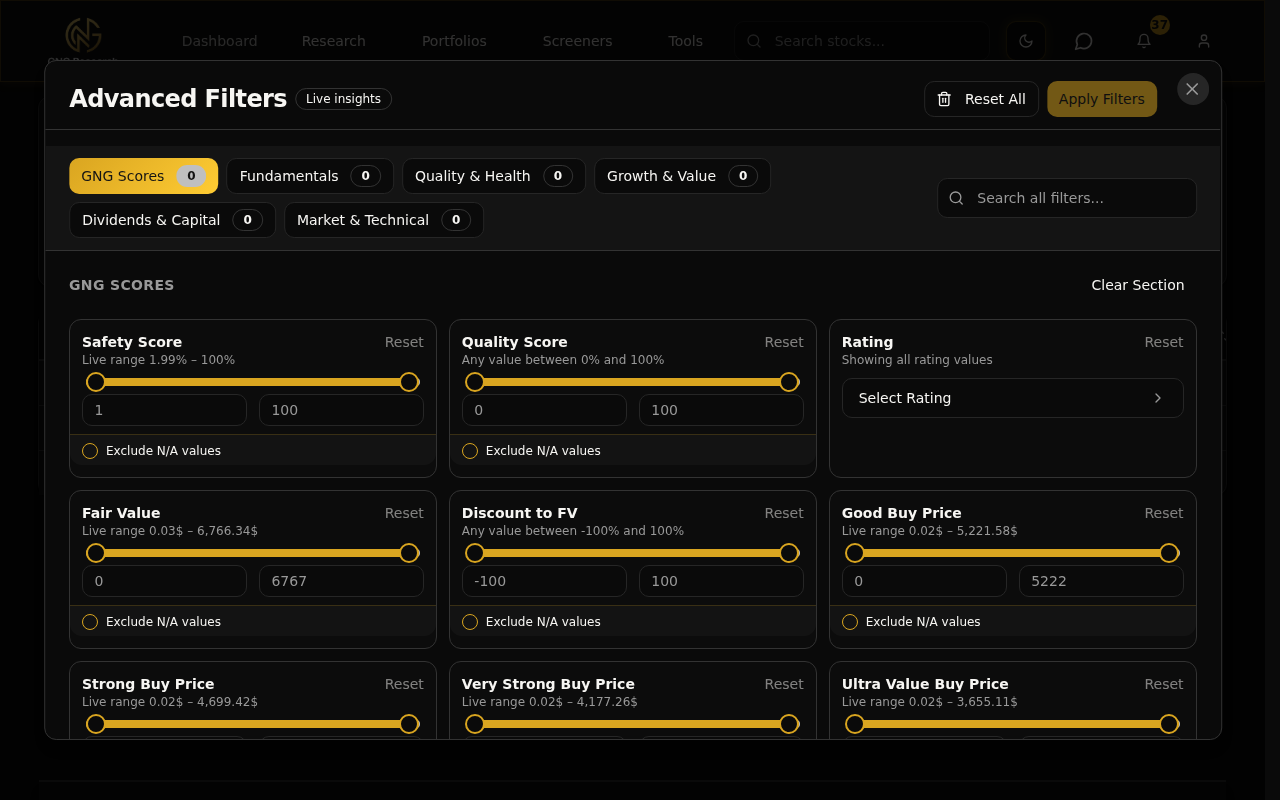
Filters
Click "Filters" and you get the full filter system. Same range filters, multi-select filters, and Exclude N/A toggles from the Research Terminal. Set a minimum P/E, a maximum payout ratio, filter by sector.. whatever you need. The Filters button shows a badge with the number of active filters so you always know at a glance. Active filters also show as removable chips above the table.
Notes
Click "Notes" to toggle the notes panel. This shows all your per-ticker notes in a side panel. More on notes in a dedicated section below. The button shows a badge count of how many tickers have notes.
Add Tickers
The "Add Tickers" button opens the same modal we covered earlier. You can add more tickers at any time.
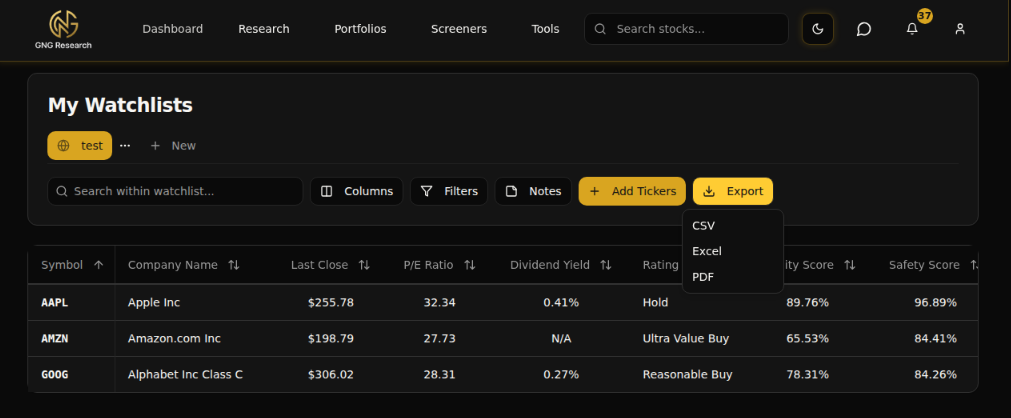
Export
Click "Export" and you get a dropdown with three options:
CSV - Plain text comma-separated file. Works everywhere.
Excel - Native .xlsx file with formatting.
PDF - Clean printable format.
The export includes whatever columns you currently have selected, and it respects your tier access. So the data you see is the data you get.
Working with Your Data
The data table in your watchlist works exactly like the Research Terminal. If you've already read that guide, you know what to expect. If not, here's the quick version:
Sort - Click any column header to sort ascending or descending. N/A values always go to the bottom regardless of sort direction.
Aggregations - Enable sum, average, median, or count on any numeric column. These show up in a sticky row at the top of the table.
Auto-Save - Every change you make to columns, sort, and filters is automatically saved to that specific watchlist. Come back tomorrow and everything is exactly how you left it.
Mobile View - On smaller screens, the table switches to a card-based layout with each ticker showing its key data. Touch-friendly selection and navigation.
Click a Ticker - Click any row to go directly to that stock's detail page.
Managing Tickers - Selection & Bulk Actions
Need to clean up your watchlist or reorganize? The selection system makes it easy. On mobile, you'll see checkboxes next to each ticker card. Select the ones you want to manage and a sticky footer appears at the bottom of the screen showing how many tickers you've selected.
From the footer, you can:
Delete Selected - Remove those tickers from the watchlist (with confirmation)
Move to... - Move the selected tickers to a different watchlist. They'll be removed from the current one and added to the destination. This option only shows up if you have two or more watchlists.
Edit Notes - If you have exactly one ticker selected, you can open the notes editor for that ticker.
The Notes System
This is one of those features that seems simple but ends up being really useful. Every ticker in your watchlist can have a personal note attached to it. Up to 2,000 characters per note.
Adding & Editing Notes
Select a single ticker using its checkbox
Click "Edit Notes" in the selection footer
A dialog opens with a text area and a character counter
Write your notes. "Waiting for Q2 earnings before buying", "Strong dividend growth, watch payout ratio", whatever you want to remember.
Click "Save"
Viewing Notes
Click the "Notes" button in the toolbar to toggle the notes panel. It shows all tickers that have notes, with each note's content and an edit button. Really handy when you want to quickly review your research notes across the whole watchlist.
Public vs. Private Notes
By default, your notes are private. Nobody else can see them. But if you're on a Pro tier or above and your watchlist is public, you'll see a toggle in the notes editor to make individual notes public. When a note is public, anyone viewing your watchlist on the Community page can read it. This is great for sharing your thesis or reasoning behind a pick.
Making Your Watchlist Public
Want to share your picks with the community? Here's how:
Click the three-dot menu on the watchlist tab you want to share
Toggle the "Public" switch on
A globe icon will appear on the tab so you can always tell which watchlists are public
Once it's public, your watchlist shows up on the Community Watchlists page. Other users can browse it, like it, and copy tickers from it.
You can also add strategy tags to help people find your watchlist. Click "Edit Tags" from the three-dot menu and select up to 3 tags that describe your strategy. Tags like "Dividend Income", "Growth", "Value", "Blue Chip".. there are 20 to choose from.
Want to make it private again? Just toggle the switch back off. It disappears from the community page immediately.
Sharing Your Watchlist
Once your watchlist is public, you can share it directly with anyone.
Click the three-dot menu on the public watchlist tab
Click "Copy Share Link"
The URL gets copied to your clipboard
The link format is clean and readable: gngresearch.com/community-watchlists/@yourusername/watchlist-name. Anyone with a GNG account can click the link and see your watchlist. They can like it, browse all the tickers, read your public notes, and copy tickers into their own watchlists if they're on a Pro tier or above.
Community Watchlists Page
Now let's talk about the other side of the system. The Community Watchlists page is where you discover what other people are tracking. Navigate to Research > Community Watchlists and you'll see a full browsing experience.
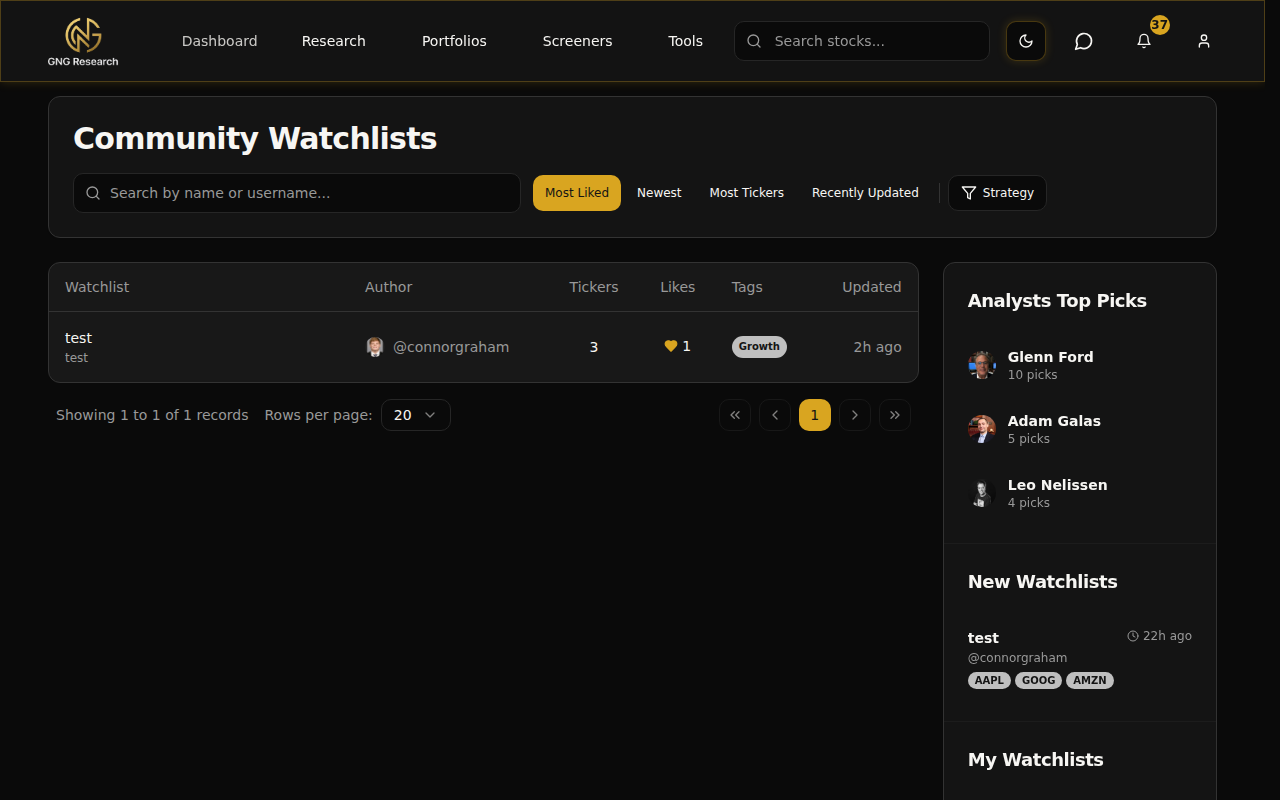
The Main Feed
The main section shows a table of all public watchlists. Each entry shows:
Watchlist name and description
Author avatar and username
How many tickers are in it
Like count with a heart button
Strategy tags (up to 3)
How recently it was updated
Search & Sort
At the top, you've got a search bar that searches by watchlist name or username. Next to it are sort buttons:
Most Liked - Community favorites first
Newest - Recently created watchlists
Most Tickers - Biggest watchlists first
Recently Updated - Most actively maintained lists
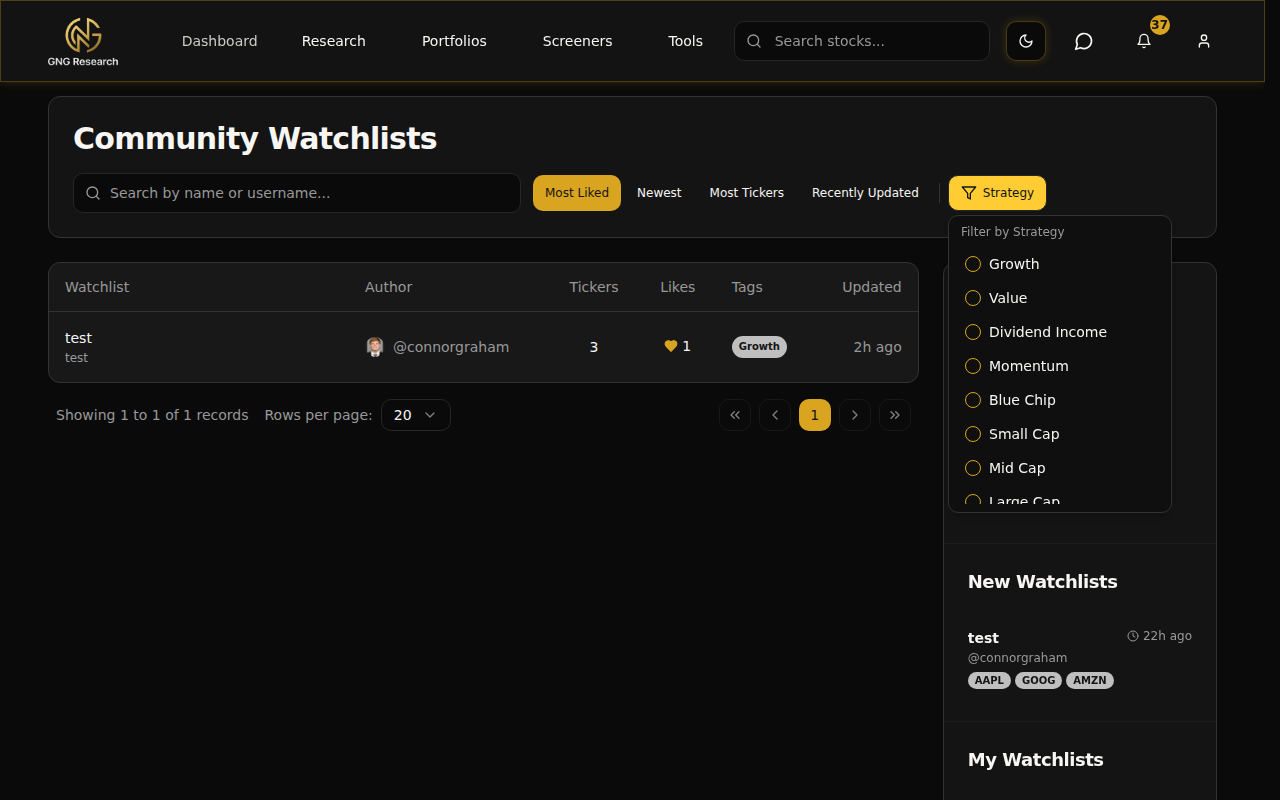
Strategy Tag Filter
This is really useful. Click the strategy filter and you can check off one or more tags to only see watchlists that match. Looking for dividend-focused lists? Check "Dividend Income". Want growth picks? Check "Growth". You can combine tags to narrow things down even further.
The Sidebar
On the right side, you'll see a sidebar with four quick sections:
Analysts Top Picks - Curated selections from our top picks system
New Watchlists - The 5 most recently created public watchlists
My Watchlists - Quick links to your own watchlists (top 5)
Trending Tickers - Market movers that auto-refresh every 60 seconds
Viewing a Community Watchlist
Click on any watchlist from the community page and you'll land on its detail page. Here's what you'll see:
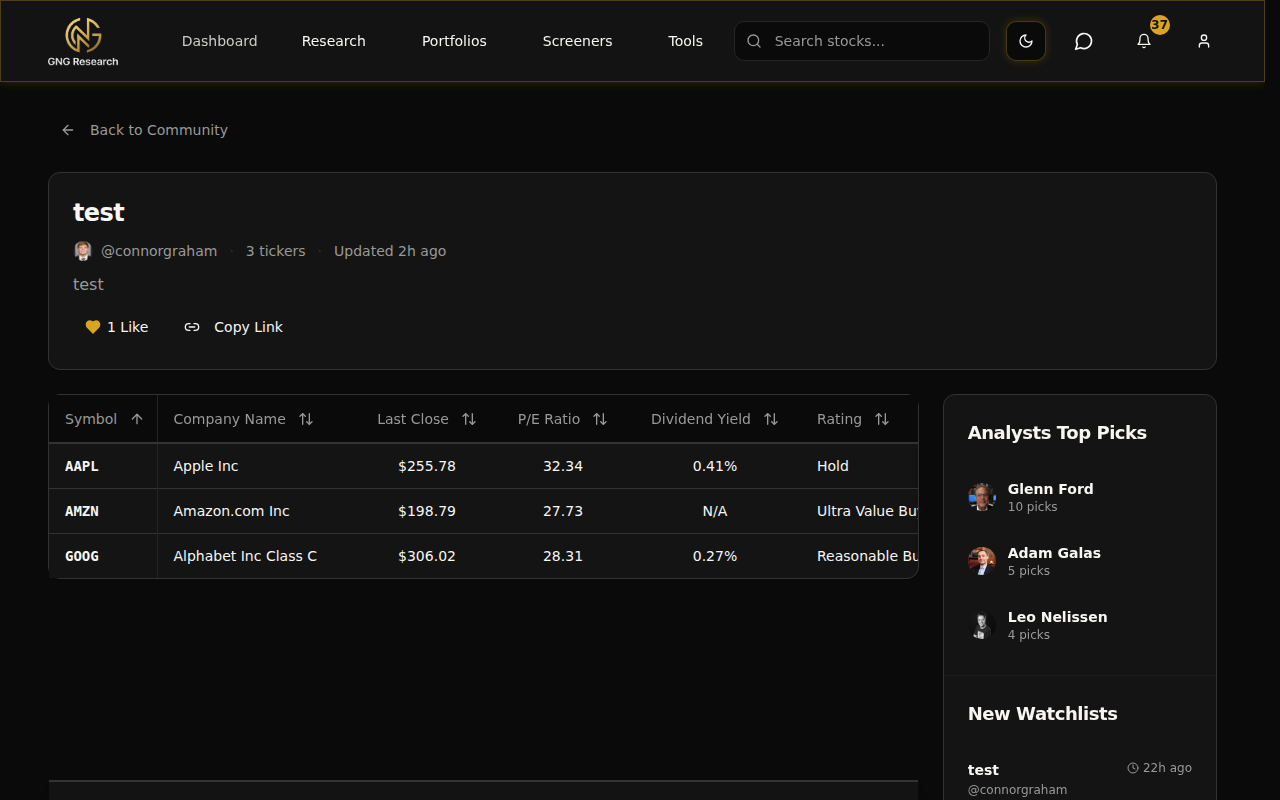
The Header
At the top, you've got the watchlist name, author info (avatar and username), ticker count, and when it was last updated. If the author added a description, that shows up here too.
You'll also see action buttons:
Like Button - Heart icon with the like count. Click to like, click again to unlike. It's instant, no page reload needed.
Copy Link - Copies the watchlist URL to your clipboard so you can share it.
The Data Table
The table shows all the tickers in the watchlist using the column layout that the author set up. It's read-only. You can't edit anything here, but you can see all the same data columns, sort by clicking headers, and browse through the list.
Author Notes
If the author has made any of their per-ticker notes public, you'll see them on this page. This is where the community aspect really shines. Someone shares their watchlist and says "I'm watching MSFT because of strong cloud growth and increasing dividends".. that kind of context is invaluable.
What's Available on Each Tier
I always want to be transparent about this stuff. Here's the honest breakdown of what you get on each tier.
Personal Watchlist Limits
Free: 1 watchlist, up to 10 tickers per watchlist
Pro: 5 watchlists, up to 50 tickers per watchlist
Platinum: 15 watchlists, up to 200 tickers per watchlist
Enterprise: Unlimited watchlists, unlimited tickers
Feature Access by Tier
Free: Create watchlists, add tickers, search, sort, filter, basic columns, per-ticker notes (private only), export (CSV/Excel/PDF), browse community watchlists, like watchlists
Pro: Everything in Free, plus: make watchlists public, add strategy tags, make notes public, copy tickers from community watchlists, access to premium columns
Platinum: Everything in Pro, plus: access to all 298 columns, higher limits
Enterprise: Everything, no limits
The free tier is genuinely useful here. You get a full watchlist with 10 tickers, all the core features like filtering and exporting, and you can browse everything in the community. The main things you unlock with Pro are the ability to share publicly and copy from community watchlists.
Pro Tips
Here are some shortcuts and tricks I use myself:
Use bulk paste to build watchlists fast. If you've got a list of tickers from a screener, article, or spreadsheet, just paste them all at once instead of searching one by one. Saves a ton of time.
Create separate watchlists for different strategies. One for dividend stocks, one for growth plays, one for stocks you're actively considering buying. Keeps everything organized and lets you set up different column layouts for each.
Use the column search. Instead of browsing through all six super categories in the column selector, just type what you're looking for. "div" for dividend columns, "debt" for debt metrics, "growth" for growth rates. It's way faster.
Add notes while you research. When you find something interesting about a stock, jot it down right there in the watchlist. "Strong FCF growth last 3 quarters" or "Earnings call Feb 15, watch for guidance". Future you will thank present you.
Use strategy tags on public watchlists. If you share a watchlist, adding tags like "Dividend Income" or "Value" helps people find it. More visibility means more likes and more community engagement.
Move tickers between watchlists. Changed your mind about where a stock belongs? Select it, click "Move to...", and pick the destination. No need to delete and re-add.
Check the community sidebar for ideas. The trending tickers and new watchlists sections update automatically. It's a quick way to see what's moving and what other people are watching.
Export filtered results. Apply your filters first, then export. You'll get a clean file with only the stocks that matched your criteria, not the whole watchlist.
Wrapping Up
That's watchlists from top to bottom. You've got personal tracking with all the Research Terminal data at your fingertips, a notes system to keep your research organized, and a whole community layer where you can share your picks and discover what other people are watching.
In the next phase, we're building out watchlist alerts. Think price threshold notifications, metric alerts, and email notifications when a stock on your list hits a target. It's going to make the whole system even more powerful.
If you have any questions or feedback about watchlists, drop it in the comments below or jump into Rocket Chat and let me know. I read everything. And if you haven't tried creating a watchlist yet, go do it right now.. it takes 30 seconds and honestly, the more you use it, the more you'll find your own workflow with it.
Thanks for reading, and I'll see you in the next guide.